Choosing a dedicated server in Romania is mainly a capacity and operations decision, not a search for the longest specification list. Start with the workload you must run, measure its CPU, memory, storage and network requirements, then leave enough headroom for traffic peaks, maintenance and growth. This guide explains the decision process and maps common workloads to the current TinyServers Ryzen plans hosted in Bucharest.
Compare dedicated servers in Romania or use the checklist below before you order.
VPS or dedicated server?
A VPS is usually the efficient choice for small websites, development environments, low-volume APIs and workloads that need to scale gradually. A dedicated server becomes useful when you need predictable access to physical CPU cores, larger memory capacity, more local storage, stronger workload isolation or the freedom to run a dense container or virtualization platform.
| Decision factor | VPS | Dedicated server |
|---|---|---|
| Best fit | Small and medium workloads, staging, websites and lightweight services | Sustained production workloads, databases, game servers, CI/CD and virtualization |
| Resource model | Virtual CPU, RAM and storage allocated on a shared host | Physical CPU, memory and disks assigned to one customer |
| Scaling | Easy to start small and move between plans | More headroom per node, but hardware changes require planning |
| Provisioning | Normally available in minutes | Prepared individually; TinyServers normally provisions in 48–96 hours |
| Operations | Lower entry cost and simpler capacity planning | More control, with greater responsibility for monitoring, backups and recovery |
If your application runs comfortably on a VPS and monitoring shows stable CPU, RAM and disk latency, moving to bare metal may add cost without solving a real problem. If the VPS repeatedly reaches its limits, suffers from sustained CPU contention, needs much more memory or must host several isolated workloads, a dedicated server is easier to justify.
Seven requirements to measure before choosing hardware
1. Sustained and peak CPU usage
Measure normal CPU utilization and peak periods separately. A workload that averages 20% but reaches 100% during imports, backups or traffic bursts needs different headroom from one that remains flat all day. Core count matters for parallel workloads such as build runners, containers and multiple game instances. Single-thread performance matters for applications that cannot spread work across many cores.
2. Working memory, not only allocated memory
Look at actual RAM consumption, file cache and swap activity. Databases and Java applications often use available memory productively, so consistently full RAM is not automatically a fault. Repeated swapping, out-of-memory events and process restarts are stronger signs that the node is undersized. Allow capacity for the operating system, monitoring agents and backup jobs in addition to the main application.
3. Storage capacity and latency
Capacity answers how much data you can keep; latency and throughput determine how quickly the application can use it. SSD is adequate for many entry workloads. NVMe is a better fit for busy databases, search indexes, build caches, container layers and applications that perform many small random reads and writes. Plan free space for logs, temporary files, updates and local backup staging instead of sizing the disk to current data alone.
4. Network traffic and audience location
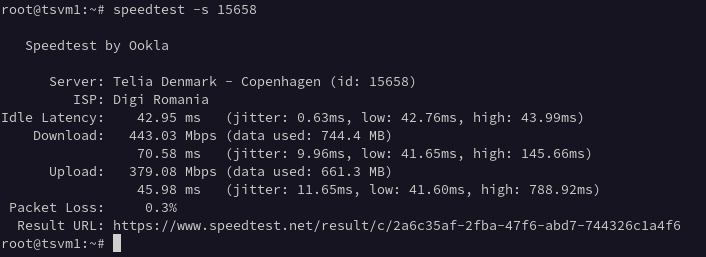
TinyServers dedicated plans include an unmetered 1 Gbps port and one public IPv4 address. Hosting in Bucharest is a practical choice when users or connected systems are in Romania and Central or Eastern Europe. Test application-level latency to the actual audience; a speed test to a nearby endpoint does not replace end-to-end measurements from customer locations.
5. Workload isolation
List the services that will share the node. A web application, database, queue, monitoring stack and build runner can interfere with one another even on dedicated hardware. Containers provide process isolation, but they do not create additional CPU, RAM or disk throughput. Reserve limits for non-critical jobs and keep business-critical databases away from noisy batch work.
6. Recovery objectives
Decide the maximum acceptable data loss and recovery time before choosing a server. A dedicated node is still a single physical system. Backups should be stored outside the server and restoration should be tested. If the application cannot tolerate the loss of one node, design replication or a multi-node architecture rather than assuming larger hardware creates high availability.
7. Growth and migration margin
Size for measured near-term growth, not an undefined five-year forecast. A practical target is enough spare capacity to absorb traffic peaks and the next expected release cycle without paying for hardware that will remain idle. Document the threshold that triggers an upgrade or a second server, such as sustained CPU above 70%, regular swap use or storage exceeding 75%.
TinyServers dedicated server comparison
The current range covers three clear capacity levels. Prices and availability can change, so use the linked product pages as the source of truth when ordering.
| Plan | CPU | RAM | Storage | Good starting point for | From |
|---|---|---|---|---|---|
| Ryzen 3 | Ryzen 3 3200G, 4C/4T | 16 GB DDR4 | 240 GB SSD | Agency sites, small stores, development and private services | €54/month |
| Ryzen 5 | Ryzen 5 5500GT, 6C/12T | 32 GB DDR4 | 512 GB NVMe | Container stacks, multiple sites, SaaS applications and databases | €69/month |
| Ryzen 7 | Ryzen 7 5700G, 8C/16T | 64 GB DDR4 | 1 TB NVMe | High-traffic applications, larger databases, CI/CD and virtualization labs | €89/month |
Do not choose solely by CPU model. For a storage-heavy database, the Ryzen 5 plan with NVMe may be a better operational baseline than the entry SSD plan even when four CPU cores would otherwise be sufficient. For a memory-heavy virtualization lab, the Ryzen 7 plan may be justified by 64 GB RAM before CPU becomes the limiting factor.
View all dedicated server plans and current availability.
Example sizing by workload
Multiple WordPress or e-commerce sites
Start from measured PHP worker concurrency, database size and cache behavior. The Ryzen 3 plan can suit a modest portfolio with careful caching. Choose Ryzen 5 when several production sites share the node, database activity is heavier or you want NVMe storage and more memory headroom.
Database or analytics node
Prioritize RAM and NVMe storage. Confirm the active dataset size, write rate, index growth and backup window. The Ryzen 5 plan is a balanced starting point; Ryzen 7 adds memory and storage for larger datasets. Keep an external backup and do not treat one physical server as a complete high-availability design.
Game server
Check single-thread CPU requirements, memory per instance, tick rate and player location. One large instance and several smaller instances have different scheduling behavior. The Bucharest location can reduce latency for Romanian players, but test from the actual player networks before making a final decision.
Containers and CI/CD runners
Count concurrent builds and set CPU and memory limits. Build caches and image layers benefit from NVMe, while parallel jobs benefit from more cores and RAM. Separate deployment credentials from build containers and prevent untrusted jobs from reaching host-level sockets.
Virtualization lab
Memory is often the first constraint. Add the RAM assigned to guests, reserve capacity for the host, and account for storage growth from snapshots. Ryzen 7 is the natural fit in the current range when multiple virtual machines must run at the same time.
Pre-order and deployment checklist
- Record seven days of CPU, RAM, swap, storage and network measurements from the current environment.
- Separate normal usage from peak jobs such as imports, builds, backups and traffic campaigns.
- Calculate current data size, monthly growth and temporary space required during backups or upgrades.
- Choose SSD or NVMe based on workload latency, not only advertised capacity.
- Define off-server backups and perform a test restore.
- Document firewall rules, administrator access and key rotation before migration.
- Lower DNS TTL before cutover and keep the old environment available during validation.
- Set monitoring thresholds that will trigger an upgrade or a second node.
- Allow 48–96 hours for dedicated server provisioning after payment confirmation and service review.
- If the sizing remains uncertain, contact TinyServers with the workload and measurements before ordering.
Dedicated server Romania FAQ
What is a dedicated server?
A dedicated server is a physical machine assigned to one customer. Its CPU, memory and local storage are not divided into VPS plans for unrelated customers.
When should I move from a VPS to a dedicated server?
Move when monitoring shows sustained resource pressure, when you need more RAM or storage than a practical VPS provides, or when physical resource isolation is an operational requirement.
Why choose a dedicated server in Romania?
A Romanian location can reduce latency for users and connected systems in Romania and nearby European markets. It also keeps the infrastructure inside the European Union.
How much RAM should a dedicated server have?
Use measured peak memory, add the operating system and background services, then keep headroom for growth. TinyServers currently offers dedicated plans with 16 GB, 32 GB and 64 GB RAM.
Should I choose SSD or NVMe storage?
SSD is suitable for many entry workloads. Choose NVMe for busy databases, build systems, search indexes and applications sensitive to storage latency.
How long does dedicated server provisioning take?
TinyServers normally provisions dedicated servers in 48–96 hours after payment confirmation and service review because each physical server is prepared individually.
Does a dedicated server include an IPv4 address?
Yes. Current TinyServers dedicated server plans include one public IPv4 address, root access and an unmetered 1 Gbps network port.
Next step: compare the current dedicated server plans in Romania, or send your measurements to TinyServers if you need help matching the workload to a server.